Saturday, November 24, 2012

Soviet Saga Continues... Heavy Support!

Needs More Weapons!
Woah. Long post. Best get the kettle on...
SO the groundwork had been laid for my Soviet force with the infantry company. We even got down to playing some games, which turned out to be important.

Over on the workbench my wet pallet was up and running and I had found my figure painting 'groove' but I knew I needed some staying power to work my way through the lead ahead. Getting in some fun skirmish games with the minis I had already completed did a lot to keep enthusiasm and momentum going.

We played Iron Ivan's Disposable Heroes, using the Russian and German lists as well as Point Blank. We even tried out some home-brewed mods for the excellent but sadly OOP Kampfgruppe Normandy. All great fun gaming.

Anti-Tank Rifles and Maxim MG Teams on the move.
Meanwhile the painting queue demanded action! Support weapons were necessary to keep the fascist foe on the run and the Plastic Soldier Company 'Russian Infantry Heavy Weapons' box was clearly the way forward.

Keep in mind this Summer '43 ETO project began entirely as a classic gamer's 'oooh shiny' moment. One day I was content doing 15mm sci-fi and some 20mm Vietnam, and then wham! - "Welcome to The Party, proletariat comrade".

To complicate things I was completely naive and ignorant. My understanding of WWII Soviet stuff was nil. So as soon as I realised the Plastic Soldier Co. box-sets were Platoon-Strength that really helped me to commit to this project. Building up a Soviet force this way is pretty darn easy.

82mm Mortar Teams. Ammo crates from Britannia.
The Infantry Heavy Weapon box contains 39 nicely detailed, multi-part figures that build up into fifteen weapon teams as well as three individual figures on the move.

These are 'multi-part', not 'many-part' figures; very easy to assemble, not too fiddly and offer a degree of customisation.The experienced plastic figure modeller will find good fodder for conversion here.

Basing. Little dioramas of hobby joy!


Inspired by the scale of play and modelling work of friends playing Kampfgruppe Normandy, it seemed the right time to try something new; to put some effort into basing these weapons teams.
 
50mm Mortar Teams
My old habits from skirmish gaming; the flexibility of single basing every figure and weapon, were just not going to cut it for the bigger 'Kursk themed' games to come!

So I took stock of my situation, had a good look about my favourite forums and made sure I was ready for what lay ahead.

I had some hexagonal bases on hand from that super chap, Murray, at Warbases. Those would play a part. The hex itself has naught to do with any rule-set I play, I just wanted to use them up!

As for scenic-décor, I had plenty of rocks on hand, previously cast using a selection of Woodland Scenics moulds. I knew I wanted to use Tufts, Static Grass and various types of Clump Foliage; typical gaming ground-cover, so stopped by the FLGS to stock up on those supplies, too.
Maxim MG Teams laying down some fire.
As always, the goo that binds everything together when I do basing work of any kind is High Solid Gel (Matte) from Golden Acrylics. I texture this with Woodland Scenics fine turf, and tint it with raw sienna acrylic paint plus some ochre pigment. Where I live, this combo is both cheaper and easier to customise for basic ground-work when compared to the Tamiya Texture Paints or the Vallejo Gels, both of which are just super.


Anti-Tank Rifle Teams in Ambush!
I do not own many Citadel products, they are usually high cost for the quality that you get. However, I have been working on a tub of Citadel Modelling Sand for a long while now, and it just won't quit.
I lock down and tint the sand with a coating of home made 'Dip' consisting of Matte Medium and Daler-Rowney  Antelope Brown and black acrylic inks.
In fact, I use Matte Medium, straight-up to glue down sand, tufts, static grass and clump foliage; anything and everything that lies 'on top' of my ground-work is held in place with this most versatile medium!

Groundwork ties it all together. Very satisfying.
 My collection of toys was growing by leaps and bounds...
As this Red Russian project began to pick up steam it quickly became clear I had an opportunity to push myself, not only to do better hobby-work, but also to come to grips with a huge aspect of WWII that I knew nothing about.

Is Peabody actually a Bee?


Ok, big post.
My humble thanks if you took the time to read all the way down to here. I hope you at least refilled your teacup and got a biscuit along the way.
Maybe the next post will be more brief!

Until then,

Peabody out!

Sunday, November 18, 2012

За Родину! Seriously...

What the heck has Peabody been up to for all these months!?

A fair question. It seems I have caught that most dread gaming bug: '20mm WWII'. And not the bog-standard 'Normandy virus', no. I have 'Kursk Pocket' syndrome.

The symptoms have impacted heavily upon my hobby lifestyle!

For most of a year now I have been browsing Osprey, Squadron, Concord and Tank Power publications, pretending to do research, all the while my 'Stash' has grown out of control with kits and minis wondrous and new. To me.
In hindsight, I have only just begun to tap the awesome resources available to the typical 20mm historical gamer.

Serious self discipline has been needed over the last months, an incredible total focus of mind and body, to clear the portion of my lead-mountain that had irresponsibly surged from the cupboard to invade my peaceful living room.

And my campaign is almost won! Soon 'The Rogue Stash' will be constrained to its allotted cupboard and the oppression of The Living Room will end!

Over the coming days and weeks, I look forward to recounting the glorious victories our 'Stash-Reduction-Programme' has achieved.


No better place to begin than with the humble оловянный солдатик - toy soldier.
The foot soldier is fundamental, even when gaming a theatre famous for clashing armour, like Kursk.

Urrrah! PSC and Elhiem minis work well together!
I turned to the Plastic Soldier Company for mass and relied on the Elhiem Figures Red Army line to add animation, versatility and class to my platoons of infantry.

Matt Hingley is the the talented chap behind Elhiem figures. His sculpts have a life all to themselves and while there is every reason to build your army entirely from Elhiem stocks, I especially like the way they mix with other lines.

The PSC Russian Infantry in Summer Uniform box is a multi-piece set that builds into 57 very nicely detailed and proportioned figures. Tremendous Value.


One box from PSC and several packs from Elhiem gave me enough infantry for a company! I plan to game with both ordinary rifle platoons and also one of SMG toting tank riders.


Plan your collection of infantry to be flexible. Soviet TOE's changed a lot during the war.
Painting was kept very simple, sticking to my tried and true Fast Paint Method and sticking close to the suggested colours from the back of the PSC box. Vallejo, Reaper and even Citadel paints did the job.
I strongly recommend this popular speedy painting technique. It's just the thing if you need to get busy painting a lot of minis. Also a great way to get going if you are just starting out, or making a switch from another scale. With a quality mini, the work is already done for you!

In time I'll be adding engineers, scouts, medics and command figures.
How I'm going to do those will depend on the rules we settle on for playing out our Summer '43 ETO battles.
No shortage of opportunities there!


This Kursk Pocket syndrome is not so bad... The toys created by all this effort have already provided terrific fun!

Peabody out!

Sunday, March 4, 2012

Solvent Riddle: Thinners, Turps, Turpentine, Mineral & White Spirit

Our hobby, and the wonderful network of blogs and fora that connects us, is spread clear around the globe. That's something worth celebrating! And so while we all sit down to a nice cup of Assam and a few biscuits, lets consider the impact that our local way of putting things, our vernacular, may have on our selection and use of an important hobby resource.

SOLVENTS
Since I began playing more and more with oil paints, pigments and commercially available enamel based filters and washes I have realised there are a few different common solvents that could be used with these products. Yet around this funny old world of ours the names for these solvents from region to region are easily mistaken or misunderstood.

Now these solvents essentially do the same job, but as they are different, they can have a real impact on our health and on the working properties and finish of what they are mixed with. Understanding these differences and considering that Turps for you, may or may not be Turpentine for me, could help get us closer to the results we hope for.

So lets have another cup of tea and munch a few more biscuits, while we take a look at some of these useful solvents and especially at their names as they appear about the interwebs.

HAZARD NOTE: All solvent vapours are toxic. Even the 'odourless' ones!
DO have plenty of ventilation when you work with this sort of stuff. You need both fresh air coming into your workspace and polluted air going outside. A small fan in a window close to where you work, blowing air out of the room, can be the difference between cool fun and sickness.

TURPENTINE
AKA: Turps, Gum Spirits, Distilled Turpentine, Spirit of Turpentine, Oil of Turpentine, Wood Turpentine, Venice Turpentine

Artists' grade Turpentine is what we want. Its consistency and long drying time can be either advantageous or frustrating. You decide.
Distilled from tree-resins -typically that of pines- pure turpentine is reactive to both light and oxygen and will thicken if not properly stored.

Avoid 'industrial' Turpentine from hardware stores; a poor choice for our work.

Turpentine is a very strong solvent and used in high ratios, or in contact with paint over time, it can break the emulsifying agents that bind your paint. This means that turpentine may not be a good choice if you want to thin and then store a mixture for future use. However, the slight* residue left behind by quality turpentine can be useful for setting pigments, whether you apply the turpentine before, with or after the pigment is up to you.
*Opposed to thick residue left by the cheap stuff!

MINERAL SPIRIT
AKA: Turps, Mineral-Turpentine, White Spirit
Aha! The term 'Turps' leads to some confusion! But it seems to be most widely used to refer to mineral-turpentine, or mineral-spirit; a substitute for turpentine. Here we begin to look at several varieties of petroleum distillate that are intended for a variety of purposes from cleaning-up only, to fine-art finishes.
All mineral spirit is quite fast drying, in fact when working with oil paints, this solvent will be dry long before the binding medium of the paint.This allows you to crack along with your projects fairly quickly.

Again, hardware store grade mineral spirit is not a good choice for our hobby work. While white spirit is also known as paint thinner, we need something that is more refined, and for good reason...

Artists' grade white or mineral spirit is refined to remove contaminants, particularly sulphur, that can react with paint pigments. Even better, the 'Odourless' varieties are further refined to remove more of the toxic volatile aromatic compounds. This is significant given that we tend to work very close to our subjects! These are multi-purpose thinners suitable for all the oil-paint based techniques as well as for the application of pigments.

THINNERS
What's this then? No biscuit for you... A prime example of the sort of term we need to drop from our common hobby vocabulary. It's like some kind of unrevealed secret ingredient. Go ahead and Google 'Thinners', I'll wait here and have another Garibaldi...
What did you find? Nothing specific I'll bet.
When someone does a nice bit of hobby advice and lists thinners as one of the necessary materials, ask them please to be specific. I'll need blood-thinners before this clears up.


THE RIGHT TOOL
I keep both a high quality Turpentine and Odourless Mineral Spirit in my tool-kit. I don't use the turpentine as frequently as the mineral spirit, but there are times when a slow-drying solvent is the best choice.
The Odourless Mineral Solvent that I prefer is really remarkable. Gamsol, by Gamblin. This stuff rocks. If you can find some near to you, try the 2oz bottle. As with much in our hobby, a little goes a very long way!

Peabody out.

Tuesday, July 12, 2011

Initiative, Activation and Interruption

Who goes first? How are they chosen and what can I do about it? Those are always key issues for any group of people about to play a game, friendly or competitive. These are the questions that tell us not only who is pouring the first cup of tea, more importantly they tell us a lot about how the game models command and control and even fog-of-war.
Show me a game featuring a new and useful way to answer these questions and you have my attention!

Initiative
Choosing who goes first is often straightforward; dictated by the scenario we want to play, the roll of dice or draw of a card. Often a simplest, but important, aspect of any turn in a game. Bingo, done.

Activaiton
Things are getting interesting. On our turn are we each moving our entire forces, or alternating one unit at a time? Do we pick that unit or is it chosen for us somehow? Either way, this is where much of the strategist's skill lies; moving to counter and exploit the opponent's strength and weakness.

Interruption
Very interesting indeed. Many of us have played games featuring 'Overwatch' at one time or another. Overwatch allows us that chance to interrupt our opponent and, ideally, force them to alter their plans in response to our Overwatch fire. Usually a straightforward feature of a rule-set, Overwatch may or may not have impact on the big picture of the game.
But the evolution and growth in popularity of interruption mechanics from ordinary occasional Overwatch to near constant full-on reactive response by almost any unit in line-of-sight has had me fascinated! Here is a new level of sophistication; bringing unpredictable fluidity to tabletop skirmish gaming.

The Chain Reaction family from Two Hour Wargames or any of the titles from Ambush Alley Games all feature in-depth action-reaction mechanics designed to echo the chaos and fog-of-war of modern combat. These are exciting, gritty games with loyal fan-bases and strong online community support. Both feature dice mechanics to help establish the success of a reaction or interruption. Both reward the use of 'real world' tactics; the merit of Bounding Overwatch and the failing of poor scouting. Both reward the player for taking the time to get used to new ideas and ground breaking concepts.

But I recently encountered another approach to Initiative, Activation and Interruption that knocked me down with the simple and efficient way it handled all three concepts in one step. Something of a middle-way, this system primarily models fog-of-war but also offers ample opportunity for each player to respond to and interrupt the opponent's plans.

I'm Talking About Gruntz Again.
Gruntz Playing Card Activation. Aces Go First!
There are a few optional rules in Gruntz that really let this new rule-set shine. Card-based activation is one of them. Simply put, each player is dealt a hand of cards that corresponds to the number of units he can activate on his turn. The player needs to craftily plan which card each unit will get, to coordinate action in sequence. Once the cards are assigned, each player reveals the hand they have been dealt. The initiative order for the turn is set. Every unit on the table is activated according to the card they have been dealt. I may get a lucky run and activate multiple units in a row, or I may find my opponent is activating before and after my units, keeping my forces rattled and suppressed.
Coupled with the (optional) Overwatch rule Gruntz takes on the complexity and responsiveness of a more involved game with (dare I say it?) less involvement required from each player.

Good to Play
So I'm happy to see yet another game earn itself a spot on my shelf of 'good to play' games. I hope it does the same for you. I hope you enjoy the other reaction based games I have mentioned too; the added tension and excitement they offer is a big part of their fun.

Peabody out.

Thursday, July 7, 2011

Gruntz 15mm After Action Report

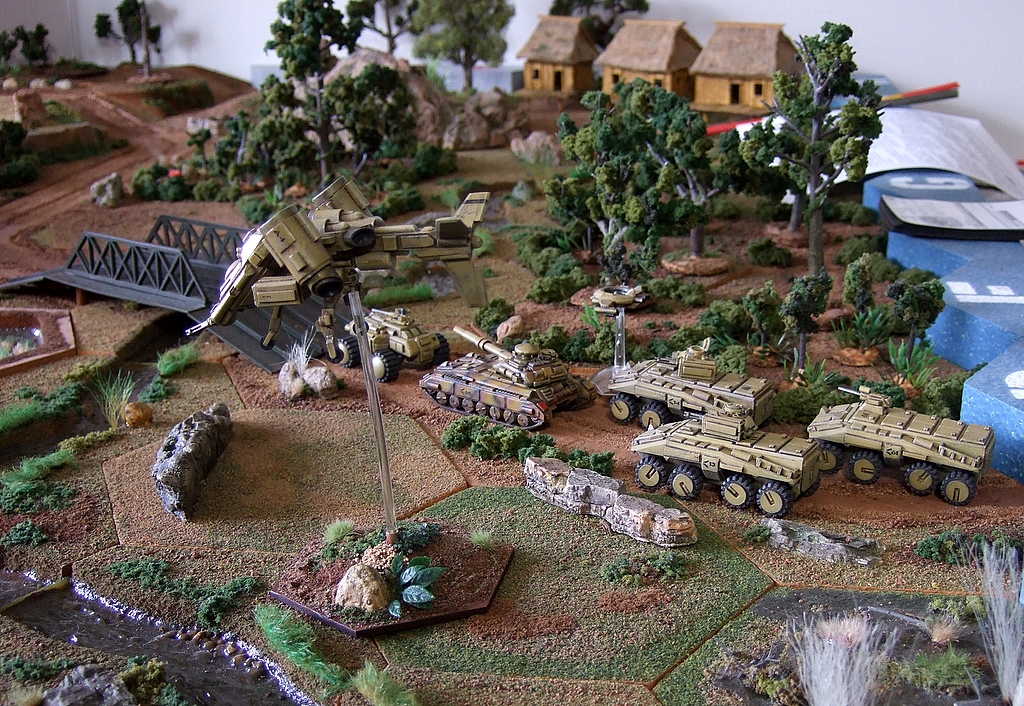
Chris from the Trumpeters Society dropped by the other day to play Gruntz. We cooked-up a  patrol scenario featuring a mid-tech force trying to move past a smaller group from a much more advanced civilisation. The setting is tropical (surprise!) and features ample opportunity for ambush!

In Gruntz terms my GZG New Israelis are bog-standard troops with SAW Squad Attachments. All Gruntz (infantry) ride inside Medium Wheeled APC's. The big assets are the UAV, armed with light missiles and a rotary cannon, as well as the tank. The commander is in a Light APC at the rear of the column and a smaller Scout car leads the way. A flying Scout drone stands by.


Chris was playing the much more advanced UNSC forces. Although he has fewer vehicles and troops, they have significant advantages. The UNSC Gruntz would be riding grav-APC's capable of doing serious damage to my vehicles. Each infantry squad has an anti-armour Squad Attachment. A group of three Spider Droids and two Specialist HMG teams round out Chris' UNSC ground troops. Two Light attack flyers are off table but can join the fun on any turn.

Numbered markers, called blinds, track the 'Bogint' units.
The UNSC have the  'Bogint' Perk, (bogus intelligence) allowing Chris to use TWO Blinds per unit until I bring one of my units into LOS and 10" of the Bogint marker.
At that point Chris may choose which blind to place his unit under. Tricky!

This is Chris' first game so we use the basic 'I-go-you-go' turn sequence, perfect for learning the game. However an Alternating Activation and a dynamic Playing Card Activation option are features of Gruntz.

Objective Turn-1: get over the bridge!
My N.I. get initiative and I move up the column, unloading the rear-most Gruntz squad and hustling them up onto the bridge.
That's my turn done.

I normally play 20mm games on this terrain. My 5'x3' table seems so much larger playing in 15mm.

Chris moves his Blinds, varying the movement rates so I can't tell which marker is what sort of unit, creating threatening groups along my route ahead...

"We have movement! Enemy Activity all over the grid!"
Chris' Spider Droids and a UNSC Gauss Canon Specialist unit reveal themselves and start firing on my Mantis UAV. This begins an ground-to-air duel that lasts most of the game, tying up my air support.

Fire from the woods draws the Scout Car's attention.
Before ending his activation, Chris reveals his second UNSC Gauss Canon Specialist and opens up on my Gruntz exposed on the bridge! "We're taking fire! Squad leader Down!"
My squad is suppressed, but fortunately for me the limited Area Effect of the canon failed to damage the APC or Wax (wound) additional squaddies. That's Chris' turn.


Uh, hello...
My response is direct and effective; the tank fires on the Gauss Specialist team, managing to take them out using both of the tank's weapon systems. The suppressed Gruntz choose a new squad leader and manage to move along the bridge.
I want to know what those other Blinds are hiding in the nearby copse and the scout car has enough mobility to get into the light woods, so off he goes to see what he can see... Surprise! It's a UNSC Grav APC!!!
The rest of the column moves up, and my second squad unloads from their APC, a Push Move from the Commander gets them into the woods ready to support the Scout Car. My turn-2 done.

Chris has me where he wants me now; my air support is tied-up and his ground troops are better than mine. He unloads his squad of Gruntz and opens fire on my infantry, Waxing two figures. My Scout car is toast; a victim of the Grav APC's Medium Plasma Canon and the Squad Attachment's RPG. His Grav APC is out of LOS of the rest of my forces, except for the Gruntz in the woods. One ray of sunshine in all this: Chris' squad of Grunts got caught in the Area Effect of one of his weapons, now his squad is also suppressed having lost a member.


But his turn is far from over. "Fast movers, incoming from the North-East!" Chris brings in his flyers, strafing from his table edge in an attempt to get a K.O. on one of my APC's.

Luck is with me this time as the leading High Mobility Wheeled APC soaks up the combined fire of the two attack fliers. As Chris' turn-2 activation comes to a close, I'm wondering two things: Where is his other APC? How long will my luck hold out?

Heading into turn-3 I return fire on the fliers with my Medium APC's. My dice are hot; I score solid hits, forcing Chris to roll for criticals with a damaged system result on each of the flyers. One takes a mobility hit, and the other won't be shooting as accurately!

I move my Tank up the wooded hillside into LOS of two more Blinds, revealing the other Grav APC! Meanwhile my Grunts converge on the the woods, one squad concentrating fire on the APC in a desperate attempt to stop the well armoured craft, and the other driving off the UNSC squad.
My activation for turn-3 ends with my UAV at last finishing off the robust Spider Droids. Now we are in the thick of the fight.

The first thing Chris does as his turn-3 activation begins is to destroy my lead Medium APC with his wounded flyers!
A stalemate is brewing between my 2 squads of Grunts and his Grav APC; neither of us has the right type of weapons to quickly defeat the other. But it's a different story on the wooded hillside, where my Tank takes heavy blows from Chris' Grav APC and another Grunts squad with RPG. Only great rolls save me from critical damage.
Suddenly that's it... I've made it through turn-3 mostly intact!  My Medium air support is one move away from dealing some serious damage to the UNSC.

We decide that the Ambushing forces at this point would most likely withdraw; accepting light casualties in exchange for having destroyed two vehicles. Our objective was met, namely to get Chris up to speed with this great new game.

An easy system to learn and fun to play, Gruntz offers depths of play we will definitely be exploring in the near future.

Peabody out.

Tuesday, July 5, 2011

Armour Round-Up

Summer road-trips, playing Gruntz 15mm, Disposable Heroes and Real Life™ have all had their part in keeping my work-bench projects from getting done.
But I'm glad to say the the Shermans for Brother Ken and my Vietnam era LVT's are finally finished! Lets have a look before I clean-up the bench and get ready to start phase two of the 15mm Sci-fi Project.

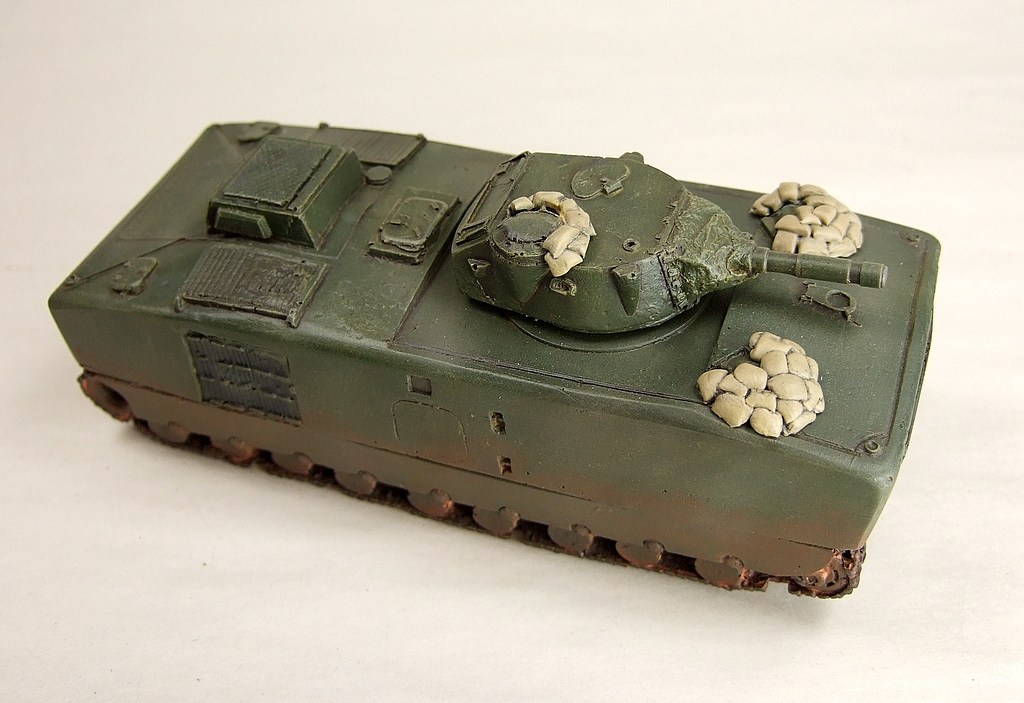
LVTP-5 amphibious troop carrier in 1/76 scale for 20mm gaming
I'm pleased with the end results of this 'olive-drab project'. The Green Stuff sandbags look fine; close enough to scale to look the part.

These resin kits were washed after assembly & primed by airbrush @ 20 psi with Vallejo Acrylic Polyurethane primer.

From there I did the usual; acrylics then oils, matte-varnish, then filters and weathering.

1/72 scale RAFM Charlie Co. USMC on 19mm bases for scale
Given the condition of these older 1/76 scale kits, I didn't put a lot of time or effort into them but they sure stand out on the table.

The LVTP-5a is an iconic piece of USMC hardware and kits for this amphibious troop carrier at this scale are rare as hen's-teeth.


Another very hard to find kit is this LVT6-H, or 'landing vehicle tracked 6- howitzer'. Featuring a short-barrelled 105mm howitzer for assault and support of amphibious landings.

Capable of direct-fire against fortified targets and also able to provide indirect fire onto distant targets, this is an unusual bit of kit for the wargames table.

The Lt. double checks the map co-ordinates; while the RTO calls for fire...

Our sessions of Disposable Heroes are really fun. Armour and infantry have their own pace, providing their own distinct friction to the game. So I'm very happy to have finished some Allied armour to add to the fray.

Here is the completed Armourfast Firefly kitbash. This was very simple and satisfying to do. In minutes this kit took on a new look.
One sticking point though: I forgot to remove and cover over the hull-MG! So while this won't pass muster with the bolt-counters, it still looks the part at 3-feet away. :)

Two Armourfast Fireflys: one out of the box, one kitbashed.

The disruptive camouflage on the barrel of the harder hitting Firefly was intended to make it harder for an enemy to identify and target this version of the Sherman. At first glance it should look like its lighter gunned companions.
The camo on the barrels was masked with Tamiya tape and liquid-mask, then airbrushed.

Two plain-Jane Armourfast Sherman M4's round out the recent line-up of simple kits from the old work-bench. That makes seven fast-build kits going out to Ken's place for our WWII games! I wonder what he will bring over for me to build and paint-up next?

Whatever he may have in mind, I'm going to make him wait. The 15mm Sci-fi experience is about to begin again with a huge build of Ground Zero Games Military Pre-Fab and Colonial Settlement (Shacks) buildings plus the most recent release of those very cool Startown Slums from Battle Works Studios.

Peabody out.

Thursday, June 9, 2011

Plasticard Kitbash Customisation


Since I'm  going to be spraying olive drab on my LVT's, Ken asked if I wouldn't consider doing up a few Armourfast Shermans at the same time.
Brother Ken has the most amazing workshop, and I get to play there pretty often. So I said 'yes'.
Two of the Shermans are Fireflies and I thought it might be fun and easy to modify the simple Armourfast kit to better resemble the iconic 'sleek' look of the Firefly.
The Clampdown
So I clamped the hull down, lined up my 54tpi razor saw along track-guards and carefully trimmed the unwanted portions away.
I followed-up by correcting the shape as needed with a file and then sanding everything smooth.

Poster-putty holds the new pieces for gluing
Corrections, corrections...
Armourfast kits are great, but they don't have much substance and now I could see clear through my Firefly! It was time for some basic styrene scratch-build techniques to make this conversion a success. Using .040 Styrene Sheet, I cut and glued some simple shapes to fill the gaps.These were then sanded flush with the rest of the model. 


Success!
Interesting conversions can be easy to do. All you need are basic tools, a few 'raw' materials and most importantly, the techniques. “Styrene Modeling” by Evergreen Scale Models is a fundamental book that should be on every gamer's shelf.

Inside this book you will learn how to change, correct and create all sorts of projects from simple kit alterations to complete true-to-scale scratch-built masters.

Peabody out.