Thursday, June 9, 2011

Plasticard Kitbash Customisation


Since I'm  going to be spraying olive drab on my LVT's, Ken asked if I wouldn't consider doing up a few Armourfast Shermans at the same time.
Brother Ken has the most amazing workshop, and I get to play there pretty often. So I said 'yes'.
Two of the Shermans are Fireflies and I thought it might be fun and easy to modify the simple Armourfast kit to better resemble the iconic 'sleek' look of the Firefly.
The Clampdown
So I clamped the hull down, lined up my 54tpi razor saw along track-guards and carefully trimmed the unwanted portions away.
I followed-up by correcting the shape as needed with a file and then sanding everything smooth.

Poster-putty holds the new pieces for gluing
Corrections, corrections...
Armourfast kits are great, but they don't have much substance and now I could see clear through my Firefly! It was time for some basic styrene scratch-build techniques to make this conversion a success. Using .040 Styrene Sheet, I cut and glued some simple shapes to fill the gaps.These were then sanded flush with the rest of the model. 


Success!
Interesting conversions can be easy to do. All you need are basic tools, a few 'raw' materials and most importantly, the techniques. “Styrene Modeling” by Evergreen Scale Models is a fundamental book that should be on every gamer's shelf.

Inside this book you will learn how to change, correct and create all sorts of projects from simple kit alterations to complete true-to-scale scratch-built masters.

Peabody out.


Tuesday, June 7, 2011

I Am Afraid of Green Stuff

Green Stuff. The stuff minis dreams are made of.
I've kept an untouched tube of G.S. in my freezer for two years. I keep finding excuses to not do something with it. "Green Stuff is too important to waste", I tell myself. "You better learn more before you try that!" My thinking has been a vicious circle and I know it. But the knowledge that Green Stuff could become rock hard, durable gaming goodness or an indestructible testament to my blobby sculpting has me skittish.
Thank heavens this week a project made its way to the old workbench that was so deeply in trouble that I finally realised there was nothing to loose. If nothing good comes out of this project, at least I will have had that critical first confrontation with the thing that is Green Stuff.
Years ago I ordered a resin 1/76 scale LVTP-5a and an LVTH-6 for my Vietnam project. Both models turned out to have quite a few bubbles and a lot of missing detail, especially around the driver's and commander's hatches. At the time I wasn't about to start a major repair project so I put them on 'The Pile' and forgot about them until this week.

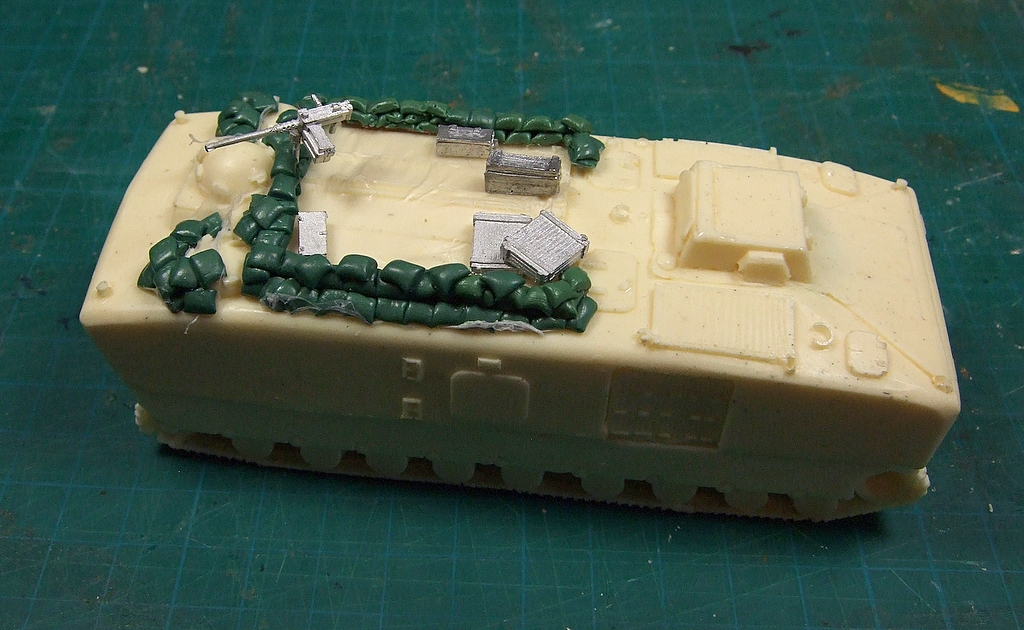
Stowage from Elheim and Britannia (Grubby Tanks)
Green Stuff to the Rescue.
Looking at pictures of these 'Nam era 'Amtracs' I realised I might have a fortunate compromise on my hands.  If I made some G.S. sandbags, and placed them to cover-up the most glaring problems, these flawed but character rich models would finally get on the table. What a great opportunity!
Cover-Up
The first step was to mix-up a little bit of Green Stuff epoxy putty. It's very sticky at first, so before starting to work with it, l let it sit while I got everything else organised over the next 10 or 15 minutes.
Meanwhile, the area of the model to be worked on was covered with Parafilm "M" so that the epoxy putty detail won't stick. This way, if I need to, I can start again without having to scrape anything off the model. Also, any detailing I make can be painted separately from the rest of the model.
You don't have to use Parafilm for this step. Plastic wrap will also work just fine.
The epoxy will want to stick to your tools, so you need to keep them moist. I have a little dish of water in the picture, but I ended up just (carefully!!!) moistening my knife & other metal tools between my lips. The Color Shapers will not stick to Green Stuff or other epoxy putties, so they are awesome tools for working this medium.

1/72 scale figure puts the picture in proportion


Cool-Down
After the bags were in place I set the model aside to allow the putty to cure.
The two components, yellow and blue, that make up the famous green putty need to be well wrapped (I use a ziploc bag) and kept in the freezer. That will ensure they are in good shape until you need them next. While in the freezer they won't contaminate your food or make the ice cubes smell funny.
So, making sandbags is an ideal way to discover the ease of working with Green Stuff. I'm not afraid any more. I still don't have great skills, but a little practice & I'll be making wicked sandbags.

See the missing detail? Sandbags will hide all...
Lift-Off
After a couple of hours, I carefully lifted the sandbags off of the model to be certain they weren't stuck.
Satisfied that the pieces fit snugly yet can be moved for painting, I put them back in place to let them finish curing completely. Only then will the Parafilm under the sandbags be pulled away.
Next, the model can be primed, painted & detailed with the sandbags and perhaps some stowage.
But lets see how it looks after priming; that will reveal all the bubble-holes in the resin.

There may be more work to do yet!

  Twice in this post I have linked to the venerable & excellent War Factory web page.
I love this site. Do visit Aidan's wonderful minis gaming resource!
.50cal from Elheim Miniatures & stowage from Britannia Miniatures (may be available at Grubby Tanks)
Peabody out.

Sunday, June 5, 2011

They Hijacked The Dropship!?

Dropship Horizon Hijacked!?
Well, not exactly...
It's true that nature abhors a vacuum. A case in point concerning the 15mm Sci-fi scene: the void created just days ago by the departure of The Dropship Horizon and her crew (Mark, Master Chef and the enigmatic Dropship Bunny) has just as suddenly been filled by a piratical group of talented scoundrels determined to keep that beacon of 15mm coolness on course.

Just How Did Peabody Get Onboard!?


Peabody Now a Suspect...
How I got on-board remains a mystery to me. I'm sure it's a Buttle/Tuttle affair, but still, I'm part of the adventure now, excited and humbled to have been brought along by these mavericks. Even if it was all a computer error....
I'll certainly try my best to do both crews proud.

Peabody out.

Wednesday, June 1, 2011

FanVan WIP -Completion

FanVans in-bound
Hey Presto! Lets jump ahead and preview the completed flyers...

When I got home from Newfoundland it was a real treat to see these waiting for me on my workbench. They sure had come a long way from the previous WIP post.
I regret not making enough time, before leaving town last week, to write this post .

How did we get here?


Decals
The dry-brushing completed, I dug out my stash of decals for this project to plan the placement of platoon id & detail decals.
I followed standard 'Decal Technique'. Spots that might get a decal first received a dab of Future. Turns out I should have dabbed twice; I still ended up with 'silvering' under some of the decals. IPMS Stockholm offers a possible solution I may try at some point. I'm not going to sweat this. I will be more careful in the future.


No filter on the middle FanVan... Really.
Filters
Boy, I wish I had pictures to better show the magic of this subtle step.  I don't, but this review does... I sprayed a coat of Vallejo Matte Varnish and once that was dry, I put down the first of two applications of a brown filter. Without a matte or satin varnish, a filter would be unable to evenly diffuse its subtle, transparent colour over a model. So the Filter technique is the opposite of the Wash which seeks to bring focus to details. Remember: a filter must be much more dilute than a wash. 
The second application went on after the first had dried. These two were enough to unite the dry-brushing, decals and basecoat on these models. 


Dust effect airbrushed onto lower areas & near intakes.
Details
Time to pull the masks off the canopies (yay!) and start on the details and weathering.
At this point I realised the metallic gold of the canopies and my base-colour are similar in tone. The overall effect is nicely high-tech military, but there isn't much contrast between the two.
I wanted these FanVans looking clean and uncluttered, so I kept the details to the minimum of lights, sensors and wheels. Dust & grime was airbrushed using highly thinned Tamiya flat earth.

Final Assembly
Sharp bits near a finished paint-job give me the shivers.
What's wrong with this picture?
I got the 'fans' and chin-guns installed without any fuss and was about to call this job done. Only then did I remember I needed to install the 5/32" brass-tube that takes the 1/4" clear acrylic rod for my flight-stands. *face-palm*
Must always remember to do this first. Before painting. Not after.
Fate was kind; the tubing went in without incident and I could call this job done.

I'm still eager to see, or to read about anyone else's FanVan plans or projects, so don't be shy.
Lets have those comments & links!

Peabody out.


Peabody Actual to Dropship Horizon

We copy your last transmission five-by-five. Thanks for the ride.
I can't think of a single blog that has been more influential, infectious and inspiring than the Dropship Horizon.

Kudos to you Mark, and to Maff, for raising the bar for everyone.

Now go roll some dice.

Respect.