Showing posts with label Painting Miniatures. Show all posts

Saturday, January 19, 2013

Stal! Stal! Stal!

"Steel! Steel! Steel!" The radio-signal, attributed to Lieutenant General P. A. Rotmistrov, launching Soviet armour into the infamous July 12, 1943 tank battle known as "Prokhorovka".

 Warning: 
The author of this post is a victim of 'Kursk Pocket Syndrome',
a contagious wargaming phenomenon. 


Steel! Steel! Steel!

Serving up a storm of Soviet armour is a big part of the appeal of gaming the Ostfront. But you have to be ready. If you want to play Red, you best be willing to build up an appropriately large collection.

Having aready established a basic foundation of infantry, support and logistics units for my summer Soviets, it was time to get serious about armour.

By Steven Zaloga, a must have!
I had done my research. Most importantly, I searched and sifted through the WIP logs at The Guild, over at SoGG and even on the Braille Scale forums. Work in progress posts are goldmines of hobby learning. I read these and chose a painting plan I knew I could already do, not one I needed to master.
I also added Steven Zaloga's T-34 in Action to my collection. Squadron books are my go-to references for wargames unit markings and paint schemes. Squadron 'In Action' books kick ass.
Basing would follow and build on work that had created the other units of this army. Simple...

So, a plan of action for building, painting and basing my first wave of Soviet armour was clear in my mind and ready to put into play.

I need a lot of T-34 model '43, please..

1/72 scale Plastic Soldier Company T-34/76.
The 'Tank Brigade Deal' from The Plastic Soldier Company was exactly what I needed. Well, in truth I split a fourth box with a buddy, leaving me with a total of TEN T-34/76 tanks to work with. Exactly what I needed.
Double bonus: These kits include separate turrets for the T-34/85, so you get twice the potential for play from each box!


Fast Build T-34/76 in 1/72 from PSC.
The PSC T-34 goes together quickly and features the right amount of detail for a good looking and solid wargaming piece.

Importantly, these models can build-up into paintable sub-assemblies; the chassis, tracks and turrets all separate. This allowed me to get the most out of my airbrush while keeping up an efficient assembly-line productivity.


Great! Building and painting this way I could easily achieve the goals of my 'Stash Reduction Programme'.

Ready to roll! T-34/76's for 20mm gaming fun.
There was one tiny bugbear: the early production PSC T-34/76 kit had a gun barrel that was way out of scale. To solve that problem I ordered the excellent 1/72 scale turned gun barrels from RB Model.
Piotr of RB Model provides super service and an excellent product.

A turned aluminium barrel from RB is inexpensive, looks sharp on your model and is a very durable alternative to one of the most fragile bits on a kit.

Please note, that as of November, 2012 the PSC T-34/76 kit was re-tooled to get that 76.2mm F-34 gun looking just right.

Painting was straightforward, making use of Vallejo Surface Primers, Tamiya Acrylics, Future/Klear, Aleran Decals, AK Interactive Washes, Gamblin Oils, and Vallejo Satin Varnish.

This company of T-34/76 tanks benefits from advance planning and research.


A platoon of T-34/76 tanks from PSC.
But my company is in conflict with history! A point that kept coming up as I read about Soviet armour at Kursk is that unit markings and turret numbers were rare... And yet the sort of games that I enjoy require that I track the status of each vehicle.
Rather than trying to build and play with an authentic force, I decided to create a company's worth of tanks featuring clearly readable markings drawn from my chosen reference material. A most acceptable gamer's compromise.

As with every project, I learned a lot and improved my skills. That's always satisfying. Best of all, the stash was reduced!


20mm T-34 Stal! by Peabody
These 20mm gaming pieces have already seen some serious action on the table, some fighting through to victory and others brewing up spectacularly.

Excellent wargaming goodness, as it should be...


Until next time,
Peabody Out!

Monday, December 31, 2012

Radio, Radio....

Respect for Moonlite Modelwerks


Calling all gamers!

This broadcast is for anyone who appreciates gaming with a finely made mini, great value and awesome friendly service.
I'm talking about the quality products of Mr. David Reasoner, the talent behind 'Moonlite Modelwerks'.
 

Moonlite offers a select line of vehicles and guns for the historical 20mm gamer. 


Soviet Gaz-AAA Radio Van by Moonlite Modelwerks
The subjects David has chosen for his catalogue all fill a niche that has been neglected or poorly served in our gaming community.
In the Moonlite catalogue you will find trucks, tows, signals vans, howitzers and field-guns for the U.K & Commonwealth, Germany, France, Poland, Netherlands & East Indies, the U.S. as well as a useful selection of generic, 'Universal' cars and trucks from the late 30's and early 40's. 

Soviet Gaz-AAA Radio Van by Moonlite Modelwerks
If you like to game out of the way theatres, Early WWII, the Inter-War period or if you play a rule-set that emphasises the importance of Command and Logistics units, then Moonlite has some very interesting pieces for you to game with.

If you want a copy of the Moonlite catalogue, or to order any of David's fine products, email him AT THIS LINK.


These kits just beg to be painted.


The beauty of the Moonlite product is that they -the vehicles at least- really are "paint and play"! The examples I'm showing here arrived, faultlessly cast, carefully packed and ready to paint.

Soviet Radio Van & Generic Staff Car by Moonlite Modelwerks
Over the last year, very few of the resin kits I ordered for this Soviet project have come close to the quality of casting that these models offer.

Each model has a definite style and charm. The level of detail is remarkable. And yet these are wargaming kits. Some of the detail is fine and fragile; the headlamps on this Gaz radio van are beautifully done! But these are robust resin models and intended for our gaming fun.

Just a great guy. 


1934 Ford Car (generic) by Moonlite Modelwerks
I really look forward to placing my next order with Mr. Reasoner. He is just a super person to do business with.
A one-man operation, Moonlite is often in demand, so I don't place orders when working to a personal deadline. This is one operation that keeps open lines of communication, so I've never had any trouble scheduling an order.


A Happy New Year and much Gaming Goodness to you all!

I'm proud to wrap up this last post of 2012 with a plug for a great guy and a good product. But I really want to wish you all a happy, healthy and fun-filled 2013! Build! Paint! Play! And do it with friends.

Well met! Peabody Out!

Monday, December 3, 2012

From Strength to Strength

To have a project -a plan- and at the same time to feel like you are part of a group enthusiastically  working together to complete the job will further anyone's 'Stash-Reduction-Programme'. 

At the end of last year I had the good sense to commit to the year-long "Group Build 2012" at The Guild, and wow, did that ever help with my focus issues.


The whole is more important than the individual (figure or vehicle...)

To meet each of the five deadlines throughout the year I would have to get work done; to approach each task with a "get ready; do; clean-up and put away" plan. No faffing about and no crazy new techniques.

Ironically this committed, 'keep up with the group', approach resulted in some significant hobby satisfaction! 
Not only did I get a lot more work done, I also developed speed, honed skills and built an army to crush my foe.... Er, yeah, I mean I built up a fine collection of historical minis in 1/72 scale... 

I remain truly grateful to those Admins at The Guild who gave up their free time to organise this activity. Must have been like herding cats, and just as rewarding. Respect.

Anti-Tank, Field Guns and Ack-Ack too,

This particular task of the group build remains one of my favourites because of the way it brought together models, minis and basing. Ok, very basic diorama work, yes. But for me satisfying because I was building on lessons learned working on the Heavy Weapons teams.

Going from strength to strength...


45mm M1942 (M-42) Russian Anti-Tank Gun
These are guns and crew from the Plastic Soldier Company  1/72 Russian 45mm Anti Tank Gun box.

The set allows you to build up two varieties of 45mm AT-gun; your choice of the M1937 or the M1942, as well you can build the M1943 Infantry Gun.

You are quite literally spoilt for choice.


1/72 Scale Plastic Soldier Co. Gun and Miniatures

 The gun models have enough detail for the gaming table and build up very quickly.

The crew figures are nicely done and in the same semi-posable, multi-part style as other PSC minis.

The abundant ammunition and spent shell-casings add a nice touch to the set. You will find shells enough to detail your bases and to save some for a future project.


'Keep Firing! They'll Notice Us Eventually'
So, these may not be the deadliest guns in Red Army history, but wisely used, they will ring bells in the right places.


76mm Regimental Gun M1943 (OB-25)
This box of four guns has already provided some good fun on our table, especially this handy little 76mm field gun, which has managed to harass and suppress artillery spotters, snipers and infantry over several games.


A Super Little Infantry Gun...

All in all, these were great fun to build, paint and base.

I am tempted to pick up another box, just to build up more of these useful 76mm guns!


ACK!

I  feel much safer with at least one real AA Gun on the table.
Our games feature infrequent, random, and devastating aircraft attacks.
Best to plan for the worst!
This classic Airfix kit of the 40mm Bofors does a bang-up job standing in for the 37mm Russian knock-off of that famous anti-aircraft gun.


Still haven't decided what I'll do with the Morris 6x4 that comes with the Airfix gun; it is a very nice looking kit and clearly a joy to paint, but staying focused on my group build means that the tractor must wait for another day.
Meanwhile, with one of these on overwatch, I'm a bit cooler under the collar.


As I said before, this was one of my favourite tasks during the year long build. It was good to draw on a classic gaming resource like Airfix as well as make use of the practical economy of new-comer PSC.
The results are nice to look at, and useful on the table too.

Until next time,
Peabody Out.

Saturday, November 24, 2012

Soviet Saga Continues... Heavy Support!

Needs More Weapons!
Woah. Long post. Best get the kettle on...
SO the groundwork had been laid for my Soviet force with the infantry company. We even got down to playing some games, which turned out to be important.

Over on the workbench my wet pallet was up and running and I had found my figure painting 'groove' but I knew I needed some staying power to work my way through the lead ahead. Getting in some fun skirmish games with the minis I had already completed did a lot to keep enthusiasm and momentum going.

We played Iron Ivan's Disposable Heroes, using the Russian and German lists as well as Point Blank. We even tried out some home-brewed mods for the excellent but sadly OOP Kampfgruppe Normandy. All great fun gaming.

Anti-Tank Rifles and Maxim MG Teams on the move.
Meanwhile the painting queue demanded action! Support weapons were necessary to keep the fascist foe on the run and the Plastic Soldier Company 'Russian Infantry Heavy Weapons' box was clearly the way forward.

Keep in mind this Summer '43 ETO project began entirely as a classic gamer's 'oooh shiny' moment. One day I was content doing 15mm sci-fi and some 20mm Vietnam, and then wham! - "Welcome to The Party, proletariat comrade".

To complicate things I was completely naive and ignorant. My understanding of WWII Soviet stuff was nil. So as soon as I realised the Plastic Soldier Co. box-sets were Platoon-Strength that really helped me to commit to this project. Building up a Soviet force this way is pretty darn easy.

82mm Mortar Teams. Ammo crates from Britannia.
The Infantry Heavy Weapon box contains 39 nicely detailed, multi-part figures that build up into fifteen weapon teams as well as three individual figures on the move.

These are 'multi-part', not 'many-part' figures; very easy to assemble, not too fiddly and offer a degree of customisation.The experienced plastic figure modeller will find good fodder for conversion here.

Basing. Little dioramas of hobby joy!


Inspired by the scale of play and modelling work of friends playing Kampfgruppe Normandy, it seemed the right time to try something new; to put some effort into basing these weapons teams.
 
50mm Mortar Teams
My old habits from skirmish gaming; the flexibility of single basing every figure and weapon, were just not going to cut it for the bigger 'Kursk themed' games to come!

So I took stock of my situation, had a good look about my favourite forums and made sure I was ready for what lay ahead.

I had some hexagonal bases on hand from that super chap, Murray, at Warbases. Those would play a part. The hex itself has naught to do with any rule-set I play, I just wanted to use them up!

As for scenic-décor, I had plenty of rocks on hand, previously cast using a selection of Woodland Scenics moulds. I knew I wanted to use Tufts, Static Grass and various types of Clump Foliage; typical gaming ground-cover, so stopped by the FLGS to stock up on those supplies, too.
Maxim MG Teams laying down some fire.
As always, the goo that binds everything together when I do basing work of any kind is High Solid Gel (Matte) from Golden Acrylics. I texture this with Woodland Scenics fine turf, and tint it with raw sienna acrylic paint plus some ochre pigment. Where I live, this combo is both cheaper and easier to customise for basic ground-work when compared to the Tamiya Texture Paints or the Vallejo Gels, both of which are just super.


Anti-Tank Rifle Teams in Ambush!
I do not own many Citadel products, they are usually high cost for the quality that you get. However, I have been working on a tub of Citadel Modelling Sand for a long while now, and it just won't quit.
I lock down and tint the sand with a coating of home made 'Dip' consisting of Matte Medium and Daler-Rowney  Antelope Brown and black acrylic inks.
In fact, I use Matte Medium, straight-up to glue down sand, tufts, static grass and clump foliage; anything and everything that lies 'on top' of my ground-work is held in place with this most versatile medium!

Groundwork ties it all together. Very satisfying.
 My collection of toys was growing by leaps and bounds...
As this Red Russian project began to pick up steam it quickly became clear I had an opportunity to push myself, not only to do better hobby-work, but also to come to grips with a huge aspect of WWII that I knew nothing about.

Is Peabody actually a Bee?


Ok, big post.
My humble thanks if you took the time to read all the way down to here. I hope you at least refilled your teacup and got a biscuit along the way.
Maybe the next post will be more brief!

Until then,

Peabody out!

Sunday, November 18, 2012

За Родину! Seriously...

What the heck has Peabody been up to for all these months!?

A fair question. It seems I have caught that most dread gaming bug: '20mm WWII'. And not the bog-standard 'Normandy virus', no. I have 'Kursk Pocket' syndrome.

The symptoms have impacted heavily upon my hobby lifestyle!

For most of a year now I have been browsing Osprey, Squadron, Concord and Tank Power publications, pretending to do research, all the while my 'Stash' has grown out of control with kits and minis wondrous and new. To me.
In hindsight, I have only just begun to tap the awesome resources available to the typical 20mm historical gamer.

Serious self discipline has been needed over the last months, an incredible total focus of mind and body, to clear the portion of my lead-mountain that had irresponsibly surged from the cupboard to invade my peaceful living room.

And my campaign is almost won! Soon 'The Rogue Stash' will be constrained to its allotted cupboard and the oppression of The Living Room will end!

Over the coming days and weeks, I look forward to recounting the glorious victories our 'Stash-Reduction-Programme' has achieved.


No better place to begin than with the humble оловянный солдатик - toy soldier.
The foot soldier is fundamental, even when gaming a theatre famous for clashing armour, like Kursk.

Urrrah! PSC and Elhiem minis work well together!
I turned to the Plastic Soldier Company for mass and relied on the Elhiem Figures Red Army line to add animation, versatility and class to my platoons of infantry.

Matt Hingley is the the talented chap behind Elhiem figures. His sculpts have a life all to themselves and while there is every reason to build your army entirely from Elhiem stocks, I especially like the way they mix with other lines.

The PSC Russian Infantry in Summer Uniform box is a multi-piece set that builds into 57 very nicely detailed and proportioned figures. Tremendous Value.


One box from PSC and several packs from Elhiem gave me enough infantry for a company! I plan to game with both ordinary rifle platoons and also one of SMG toting tank riders.


Plan your collection of infantry to be flexible. Soviet TOE's changed a lot during the war.
Painting was kept very simple, sticking to my tried and true Fast Paint Method and sticking close to the suggested colours from the back of the PSC box. Vallejo, Reaper and even Citadel paints did the job.
I strongly recommend this popular speedy painting technique. It's just the thing if you need to get busy painting a lot of minis. Also a great way to get going if you are just starting out, or making a switch from another scale. With a quality mini, the work is already done for you!

In time I'll be adding engineers, scouts, medics and command figures.
How I'm going to do those will depend on the rules we settle on for playing out our Summer '43 ETO battles.
No shortage of opportunities there!


This Kursk Pocket syndrome is not so bad... The toys created by all this effort have already provided terrific fun!

Peabody out!

Thursday, June 9, 2011

Plasticard Kitbash Customisation


Since I'm  going to be spraying olive drab on my LVT's, Ken asked if I wouldn't consider doing up a few Armourfast Shermans at the same time.
Brother Ken has the most amazing workshop, and I get to play there pretty often. So I said 'yes'.
Two of the Shermans are Fireflies and I thought it might be fun and easy to modify the simple Armourfast kit to better resemble the iconic 'sleek' look of the Firefly.
The Clampdown
So I clamped the hull down, lined up my 54tpi razor saw along track-guards and carefully trimmed the unwanted portions away.
I followed-up by correcting the shape as needed with a file and then sanding everything smooth.

Poster-putty holds the new pieces for gluing
Corrections, corrections...
Armourfast kits are great, but they don't have much substance and now I could see clear through my Firefly! It was time for some basic styrene scratch-build techniques to make this conversion a success. Using .040 Styrene Sheet, I cut and glued some simple shapes to fill the gaps.These were then sanded flush with the rest of the model. 


Success!
Interesting conversions can be easy to do. All you need are basic tools, a few 'raw' materials and most importantly, the techniques. “Styrene Modeling” by Evergreen Scale Models is a fundamental book that should be on every gamer's shelf.

Inside this book you will learn how to change, correct and create all sorts of projects from simple kit alterations to complete true-to-scale scratch-built masters.

Peabody out.


Wednesday, June 1, 2011

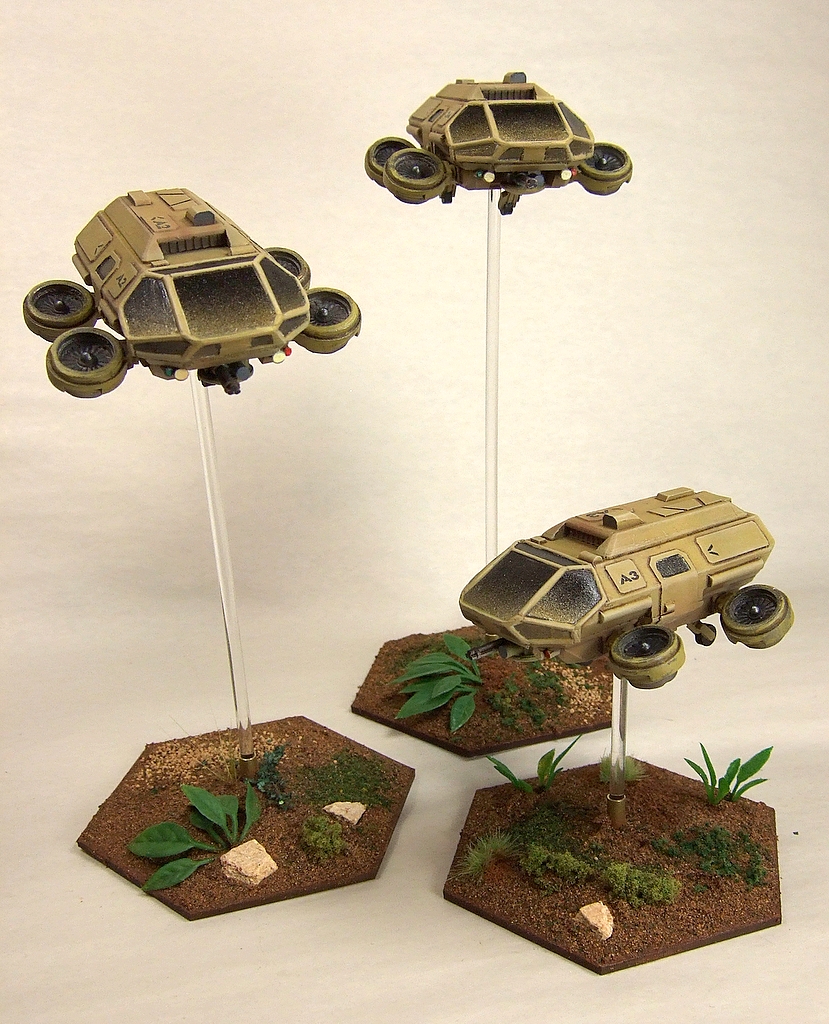
FanVan WIP -Completion

FanVans in-bound
Hey Presto! Lets jump ahead and preview the completed flyers...

When I got home from Newfoundland it was a real treat to see these waiting for me on my workbench. They sure had come a long way from the previous WIP post.
I regret not making enough time, before leaving town last week, to write this post .

How did we get here?


Decals
The dry-brushing completed, I dug out my stash of decals for this project to plan the placement of platoon id & detail decals.
I followed standard 'Decal Technique'. Spots that might get a decal first received a dab of Future. Turns out I should have dabbed twice; I still ended up with 'silvering' under some of the decals. IPMS Stockholm offers a possible solution I may try at some point. I'm not going to sweat this. I will be more careful in the future.


No filter on the middle FanVan... Really.
Filters
Boy, I wish I had pictures to better show the magic of this subtle step.  I don't, but this review does... I sprayed a coat of Vallejo Matte Varnish and once that was dry, I put down the first of two applications of a brown filter. Without a matte or satin varnish, a filter would be unable to evenly diffuse its subtle, transparent colour over a model. So the Filter technique is the opposite of the Wash which seeks to bring focus to details. Remember: a filter must be much more dilute than a wash. 
The second application went on after the first had dried. These two were enough to unite the dry-brushing, decals and basecoat on these models. 


Dust effect airbrushed onto lower areas & near intakes.
Details
Time to pull the masks off the canopies (yay!) and start on the details and weathering.
At this point I realised the metallic gold of the canopies and my base-colour are similar in tone. The overall effect is nicely high-tech military, but there isn't much contrast between the two.
I wanted these FanVans looking clean and uncluttered, so I kept the details to the minimum of lights, sensors and wheels. Dust & grime was airbrushed using highly thinned Tamiya flat earth.

Final Assembly
Sharp bits near a finished paint-job give me the shivers.
What's wrong with this picture?
I got the 'fans' and chin-guns installed without any fuss and was about to call this job done. Only then did I remember I needed to install the 5/32" brass-tube that takes the 1/4" clear acrylic rod for my flight-stands. *face-palm*
Must always remember to do this first. Before painting. Not after.
Fate was kind; the tubing went in without incident and I could call this job done.

I'm still eager to see, or to read about anyone else's FanVan plans or projects, so don't be shy.
Lets have those comments & links!

Peabody out.


Wednesday, May 18, 2011

FanVan WIP

Ok, lets commit to a full WIP series on the FanVans from Ground Zero Games. Think of it as basic armour painting 101. Not difficult stuff at all; practice and patience will be rewarded. I took this same approach with the GZG New Israeli armour & I'll want to review this at some point.
Where were we?
Lets finish up the Canopies first.
A protective coat of Future needed to be laid down over the canopies, but before I did that I decided to spray a little bit of Tamiya Smoke as a way to blend the gold & black together. Smooth.

When the Future had dried, the masking that protected the canopy frames & the rest of the models was removed and discarded.


Models are numbered to track painting masks
Time now for the canopy-glass shaped bits of tape saved when cutting the masks. Each model & its mask were numbered, so it was simple enough to match the masks with the models. Note how each 'window' was cut and laid-out in position relative to each other. A piece of scrap styrene sheet was used to keep these safe. Additional trimming or adding of thin strips of tape was done as necessary.
The masks were smoothed into place using colour shapers.
As I finish painting each model the canopies will remain covered and (in theory) protected. The big reveal will happen as I move into detail painting. Fingers are crossed from now until then.
Base-coat
Now for the base-coat. A thin, transparent coat is sprayed on at about 10psi. At this point any pre-shading I have done will either become a wonderful part of each model, or hidden under too much paint. Only a few areas of each model get second coats.
I'm using Dark Yellow tinted with drops of red-brown, yellow and black. I made sure to mix up quite a bit of this when this project began so that colour matching would not be a problem.
Gloss-coat
After the base-coat dries I lay down a  good coat of Future in preparation for the next step.
Future is self-levelling, so I can spray quite generously and still get an even, gloss finish that wont fill detail.
A gloss finish is critical for the oil wash that is to come. If I apply a wash over a matte finish, the entire surface will become stained. On a gloss finish, the wash will fill detail and any excess will be easy to remove.
The middle FanVan has been dry-brushed buff.


Oil Wash & Dry Brush
The wash is applied outlining and emphasising the details of each model. Once this dries (a day at least!) it's time for a light but thorough dry-brushing using buff artists oil paint.

Still to Come: decals, filters, details & more.