 |
| FanVans in-bound |
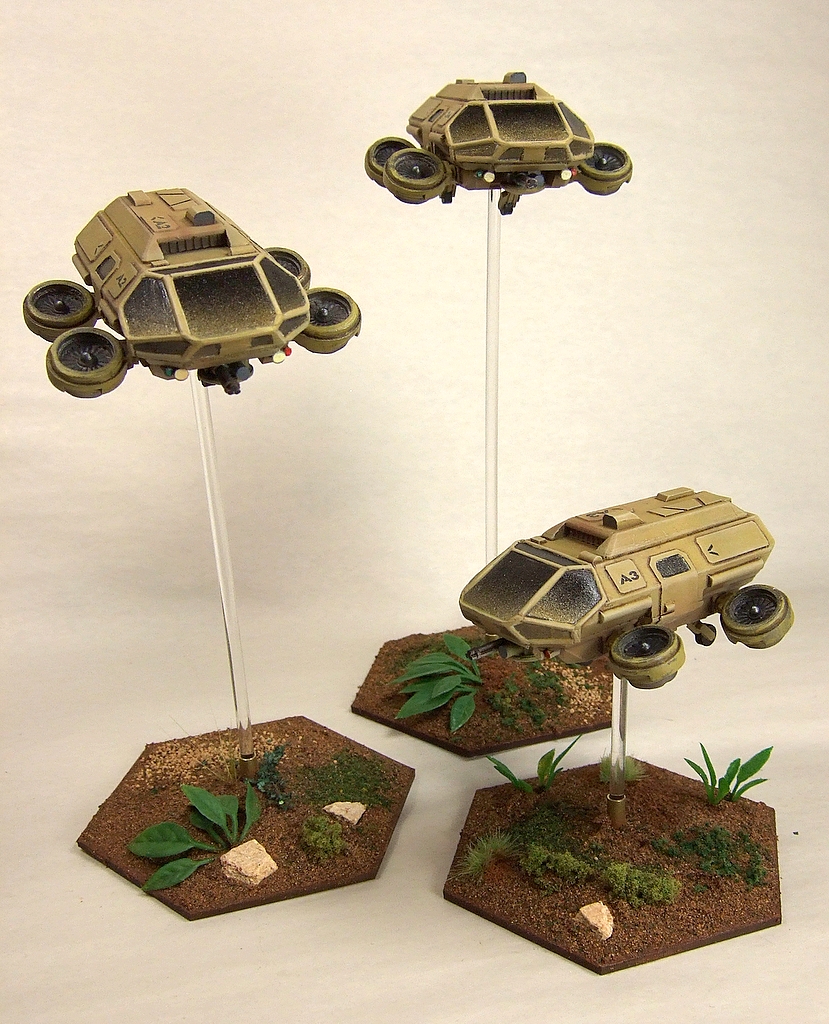
When I got home from Newfoundland it was a real treat to see these waiting for me on my workbench. They sure had come a long way from the previous WIP post.
I regret not making enough time, before leaving town last week, to write this post .
How did we get here?
 Decals
The dry-brushing completed, I dug out my stash of decals for this project to plan the placement of platoon id & detail decals.
I followed standard 'Decal Technique'. Spots that might get a decal first received a dab of Future. Turns out I should have dabbed twice; I still ended up with 'silvering' under some of the decals. IPMS Stockholm offers a possible solution I may try at some point. I'm not going to sweat this. I will be more careful in the future.
 |
| No filter on the middle FanVan... Really. |
Boy, I wish I had pictures to better show the magic of this subtle step. I don't, but this review does... I sprayed a coat of Vallejo Matte Varnish and once that was dry, I put down the first of two applications of a brown filter. Without a matte or satin varnish, a filter would be unable to evenly diffuse its subtle, transparent colour over a model. So the Filter technique is the opposite of the Wash which seeks to bring focus to details. Remember: a filter must be much more dilute than a wash.
The second application went on after the first had dried. These two were enough to unite the dry-brushing, decals and basecoat on these models.
 |
| Dust effect airbrushed onto lower areas & near intakes. |
Time to pull the masks off the canopies (yay!) and start on the details and weathering.
At this point I realised the metallic gold of the canopies and my base-colour are similar in tone. The overall effect is nicely high-tech military, but there isn't much contrast between the two.
I wanted these FanVans looking clean and uncluttered, so I kept the details to the minimum of lights, sensors and wheels. Dust & grime was airbrushed using highly thinned Tamiya flat earth.
Final Assembly
 |
| Sharp bits near a finished paint-job give me the shivers. |
I got the 'fans' and chin-guns installed without any fuss and was about to call this job done. Only then did I remember I needed to install the 5/32" brass-tube that takes the 1/4" clear acrylic rod for my flight-stands. *face-palm*
Must always remember to do this first. Before painting. Not after.
Fate was kind; the tubing went in without incident and I could call this job done.
I'm still eager to see, or to read about anyone else's FanVan plans or projects, so don't be shy.
Lets have those comments & links!
Peabody out.


Lovely lot you've got there.
ReplyDeleteFantastic job - I must get on and paint my GZG grav tanks so I can justify getting some fan vans.
ReplyDeleteDAMN SEXY!
ReplyDelete;)
Thank you gentlemen. Remember; FanVans need no justification.
ReplyDeleteThese look really great. Gritty, tough, realistic....yes, I really like them. I have been trying to resist getting into 15mm sci-fi gaming for a while, and posting great stuff like this isn't helping!!!
ReplyDeleteThey really came out excellent! Love the cockpits.
ReplyDelete"Remember; FanVans need no justification."
Haha! Very true! I have these high on my to-do list, but will arrange for some armoured support first. :)
Very nice work!
ReplyDeleteAnd thanks for the info on filters. Very interesting.
great work! I found that a bit of 'ard coat or gloss varnish, followed by a matte finish will remove the shine from decals on a mini
ReplyDeleteJust found these, I think you've sold me on the FanVans! I needed something "grav" for my New Israeli, and I think i'll go for these!
ReplyDeleteGZG. Always the right way forward for 15mm!
ReplyDeleteA bit late to the party!
ReplyDeleteI love the fan vans and what you've done with them.
I finally bought myself a couple and will be posting about them here in between other projects: http://thecolourintospace.blogspot.co.uk/2015/07/av-7-utility-transport-vtol-van.html?m=1
Never too late to join the party. These kits from GZG are worth revisiting!
ReplyDelete